I'm really enjoying using tools made from CPM 10V steel. I think this alloy is here to stay in the woodturning world. If you've been wondering what it's all about, here is a double ear-full of my opinion on the subject. This is my best effort at explaining the difference between standard M2 steel woodturning tools, and 10V steel tools.
Disclaimer: This is only my opinion! I am a woodturner, but not a metallurgist or expert.
M2 Steel Tools vs. 10V Steel Tools
M2 Steel, also called High Speed Steel, or HSS, is today's standard for Woodturning tools. It is a steel alloy that holds a sharp edge a long time, handles heat well,
and is easy to sharpen. M2 is a specific alloy of steel, being a combination of metals in a precise ratio. The heat treating process is what gives M2 its edge-holding ability. Proper heat treating is a very exacting process involving heat, temperature, and time. Top quality tools made from M2 HSS are accurately heat treated according to precise specifications. Heat treating can easily be done poorly, or improperly. An low quality M2 tool might have the correct alloy composition, but not have the edge holding performance that it would have gotten from proper heat treating.
This is why when we buy "off brand" (usually low cost) turning tools, sometimes we get a good one and sometimes we don't. What we get with top brand premium M2 tools is an alloy of the correct composition that also has been properly heat treated. This usually comes at a premium price. The easiest way to lower tool manufacturing costs is to make them in less developed countries and skimp on the heat treating.
In woodturning today, I believe that we get what we pay for. My M2 Signature Woodturning Tools are made by Henry Taylor, a company with a long standing reputation for quality turning tools, in Sheffield England, an area renowned for its quality steel tools. I have confidence that Henry Taylor Tools are as good as M2 steel tools can be.
10V, or A11, Steel is considered a Tool Steel. In the metalworking world, it is not usually used for cutting tools. It is very tough and durable. Everything that I said about the precise alloy composition and accurate heat treating of M2 applies to 10V (A11) as well. The two metals are very different, however. 10V is made using a process called "powder metallurgy", where the final product contains very fine particles of carbides.
Other powder metal tool alloys commonly found in woodturning tools are ASP 2030/2060, M4, and 15V. The extra hard carbide particles are what make powder metal tools hold an edge significantly longer than M2. 10V contains 10% Vanadium Carbides, 2060 has 7.5% Tungsten Carbides, and M4 has 4% Tungsten Carbides. The 15% Vanadium Carbides in 15V allow it to hold an edge even longer than 10V, but the edge is more brittle and can fracture more easily. I believe that 10V is the best compromise.
Powder metal tools, such as 10V, do hold an edge significantly longer than M2 tools in my experience. But that is only if it is sharpened properly. The hard carbide particles need to be sharpened with something harder than they are. If they are not, the carbide particles are not able to be formed into a part of the edge. Instead of being abraded into a sharp edge, they are knocked out of the matrix resulting in an uneven cutting edge, and end up doing very little to help the tool hold a sharp edge longer. This is why a lot of turners feel that powder metal tools don't initially get as sharp as M2 tools. They are usually not using an abrasive that will put an edge on the carbide particles.
Aluminum Oxide is softer than Carbide particles. The "white" wheels that came with your grinder are low quality aluminum oxide wheels. The "Pink" wheels, and some "blue" wheels, are also Aluminum Oxide. Norton and OneWay (among others) make excellent quality Aluminum Oxide grinding wheels. They will do a great job on M2 tools, but are not capable of forming an edge on carbides, and won't give you peak performance from your powder metal tools.
CBN, Diamond, and Ceramic are harder than Carbide, and can form a sharp edge on powder metal tools. D-Way and Opti-Grind make CBN wheels for woodturners. WoodRiver (sold at Woodcraft) and D-Way make Diamond wheels for woodturners. Norton SG wheels are 50% ceramic, their 3X wheels are 30% ceramic.
Sharpening with fine grit seems to make more of a difference in the quality of the cutting edge on 10V than it does on M2.
How do I choose between M2 Steel Tools and 10V Steel Tools?
In my opinion, the improved edge holding performance of 10V is most noticeable in a negative rake scraper. Even sharpened with fine grit regular Aluminum Oxide. I liked the 10V scrapers even more when I started sharpening with a Norton 3X, 120 grit wheel.
It wasn't until I started sharpening with a fine grit CBN wheel that I fell in love with 10V gouges. With the 3X wheel, I didn't feel like my 10V gouges got as sharp as M2. The edge on a gouge seems to be more sensitive to being sharpened properly. Honing with a diamond hone is another way to get a sharp edge on 10V.
Here's my recommendation:
If you sharpen with fine grit (100 or finer) Ceramic (Norton 3X), buy 10V scrapers and M2 gouges. You will be pleased with their performance.
If you sharpen with CBN, buy 10V gouges and 10V scrapers. You will love their performance!
If you sharpen with the white wheels that came with your grinder, and don't want to buy new wheels, buy M2 scrapers and M2 gouges.
If you hone with a diamond, you will probably love 10V tools, too. My 10V Vortex Tool is sharpened with a diamond hone. The performance of 10V is noticeable on the Vortex.
Try some 10V turning tools! You might just love their performance!
Saturday, February 2, 2013

Sunday, July 15, 2012
Gratitude
Recently, my yoga instructor suggested practicing with an intention of Gratitude. I sure do have a lot to be grateful for in my life! Good health, beautiful home, great partner, wonderful feline companions, a rewarding job....
Woodturning is my "job". It continually offers me opportunities for growth and self-discovery. Probably Woodturning is even more therapeutic than yoga. They go together well.
I have been inspired by Kip Christensen's work for decades. In the 80s, when I was a cabinet/furniture maker, he wrote some articles for Fine Woodworking magazine about Woodturning. I totally fell in love with his elegant forms! My attempts to copy his work were primitive, to say the least. With lots of practice, and inspiration from many others in the field of Woodturning, I have grown and developed my signature style of artwork.

This piece offers gratitude to Kip, for his delightful antler bowls and for being a teacher of so many of us. Gratitude goes out, also, to all of the Woodturners who have inspired me over the decades. And profound gratitude to Mother Nature for the materials that inspire me to creativity. Especially to the Moose who grew this antler. Oh, yes, and not to forget: gratitude to the Canadian Woodturner who gave me the piece of antler. If it weren't for the sharing community of Woodturners worldwide, we would all still be in the Dark Ages. Thank you all. Special thanks to Shareshten and Melissa for bringing spirituality and gratitude into my awareness through yoga practice.
What and who inspire you? Leave a comment and let me know!
Woodturning is my "job". It continually offers me opportunities for growth and self-discovery. Probably Woodturning is even more therapeutic than yoga. They go together well.
 |
| "Gratitude" Lidded Bowl made from Moose Antler, with African Blackwood, 14K Gold, 4pt Chocolate Diamond, and 24K Gold Leaf |
I have been inspired by Kip Christensen's work for decades. In the 80s, when I was a cabinet/furniture maker, he wrote some articles for Fine Woodworking magazine about Woodturning. I totally fell in love with his elegant forms! My attempts to copy his work were primitive, to say the least. With lots of practice, and inspiration from many others in the field of Woodturning, I have grown and developed my signature style of artwork.

This piece offers gratitude to Kip, for his delightful antler bowls and for being a teacher of so many of us. Gratitude goes out, also, to all of the Woodturners who have inspired me over the decades. And profound gratitude to Mother Nature for the materials that inspire me to creativity. Especially to the Moose who grew this antler. Oh, yes, and not to forget: gratitude to the Canadian Woodturner who gave me the piece of antler. If it weren't for the sharing community of Woodturners worldwide, we would all still be in the Dark Ages. Thank you all. Special thanks to Shareshten and Melissa for bringing spirituality and gratitude into my awareness through yoga practice.
What and who inspire you? Leave a comment and let me know!
Tuesday, March 20, 2012
Sue's Blue Waterfall
Inspiration can come from anywhere. Often it comes from unexpected places. In my last post, I talked about my sister Sue's suggestion that I make a blue piece that looked like a waterfall. Her suggestion got me excited! Here is the result:
I named it "Sue's Blue Waterfall", for obvious reasons. Sue's suggestion also nudged me gently into a direction that has been on my list for awhile. Now this style has gone from "I'd like to explore that further" to the top of my list.
My sister Sue is inspirational in other ways, too. Last week brought me a very rewarding experience of how great it is to have adult sisters. And of how much I can learn from them, and from Sue in particular. Though we have made different choices in our lives, we have very similar values.
Our middle sister, Karen, lives in San Francisco, I'm in Colorado, Sue's in Connecticut. The three of us got together at Sue's place for her 50th birthday.
We have all been in the same place at the same time a few times in our adult lives, but always in a bigger group. This time it was just the 3 of us for Sue's birthday.
We had the most interesting conversations!
On her actual birthday, we baked a flourless chocolate cake, and pruned the rose bush. Well, Karen and Sue did the pruning. I took pictures.
How lucky I am!
Thank you, Sue for having a birthday so we could get together.
Thank you, Sue and Karen, for being my sisters!
 |
| Sue's Blue Waterfall |
My sister Sue is inspirational in other ways, too. Last week brought me a very rewarding experience of how great it is to have adult sisters. And of how much I can learn from them, and from Sue in particular. Though we have made different choices in our lives, we have very similar values.
 |
| (l-r) Karen, Sue, Cindy |
Our middle sister, Karen, lives in San Francisco, I'm in Colorado, Sue's in Connecticut. The three of us got together at Sue's place for her 50th birthday.
We have all been in the same place at the same time a few times in our adult lives, but always in a bigger group. This time it was just the 3 of us for Sue's birthday.
We had the most interesting conversations!
 | |||
| Sue using the Pruney Chairs |
On her actual birthday, we baked a flourless chocolate cake, and pruned the rose bush. Well, Karen and Sue did the pruning. I took pictures.
How lucky I am!
Thank you, Sue for having a birthday so we could get together.
Thank you, Sue and Karen, for being my sisters!
Friday, January 27, 2012
American Craft Council Baltimore Art Show
The ACC Baltimore Show is one of the best places in the USA to see and buy Decorative Art Work. There are over 700 artists featured, with some incredibly creative work. At this show, there is truly something for everyone. You owe it to yourself to go, and to treat yourself to a new addition to your home or art collection!
It is also the only show that I plan to do on the East Coast this year. I will be in Booth #3501, at the Baltimore Convention Center, from February 24th at 10:00am through February 26th at 5:00pm. Come by and visit! I'd love to meet you!
For me, a show is a great motivator to get out to the workshop and follow some new ideas. Or maybe try to do justice to that delicious piece of burl that has been waiting for me. The weeks right before a show are usually my most creative.
 Ideas come from all different places. My sister saw this picture on the ACC website, and suggested that I make one like it in blue (her favorite color), because that shape looks like water flowing. Great idea! I had been planning to make a piece in that style again. Maybe I can get it finished in time.

Here's a piece that I just finished, one of my first for 2012. This color scheme would look good on the flowing water design.
Now I'm all excited to get out to the shop and start working! Hope to see you all at the Baltimore ACC show next month. Here are the details:
Baltimore Convention Center
1 West Pratt Street
Baltimore MD
(in the Inner Harbor area)
February 24 - 26, 2012
Booth #3501
Website: http://shows.craftcouncil.org/baltimore
Keep an eye on my website, www.cindydrozda.com, and my Facebook page to see what comes out of my workshop in the next few weeks.
Bye for now!
It is also the only show that I plan to do on the East Coast this year. I will be in Booth #3501, at the Baltimore Convention Center, from February 24th at 10:00am through February 26th at 5:00pm. Come by and visit! I'd love to meet you!
For me, a show is a great motivator to get out to the workshop and follow some new ideas. Or maybe try to do justice to that delicious piece of burl that has been waiting for me. The weeks right before a show are usually my most creative.


Here's a piece that I just finished, one of my first for 2012. This color scheme would look good on the flowing water design.
Now I'm all excited to get out to the shop and start working! Hope to see you all at the Baltimore ACC show next month. Here are the details:
Baltimore Convention Center
1 West Pratt Street
Baltimore MD
(in the Inner Harbor area)
February 24 - 26, 2012
Booth #3501
Website: http://shows.craftcouncil.org/baltimore
Keep an eye on my website, www.cindydrozda.com, and my Facebook page to see what comes out of my workshop in the next few weeks.
Bye for now!
Monday, November 7, 2011
Sunday, October 23, 2011
Crackers - Developing my signature style
Cooking can be very creative. In fact, it's my favorite "Right Brain" exercise. Crackers are one of my favorites. Easy to eat anytime, easy to carry around, great grab-&-go food that's healthy, too. Most important, they are super easy to make!
David (Nittmann) went over to Tom Wirsing's house a few weeks ago, and took a bowl of my home-made crackers to supplement the beer drinking they planned to do. I guess the crackers were good; Tom asked for the recipe (must have been the beer....). My first thought was, "I didn't exactly follow 'the' recipe".
The next thought was, "Amazing how similar cooking is to woodturning!"
I just got home from a trip to the San Diego Woodturners club to demonstrate and teach my style of woodturning. (click here for the pictures posted on Facebook) In the demo, I went through my processes, shared all of my "secrets", and completed 2 of my signature pieces. At the Hands-on Workshops in the days following the demo, I guided the participants through making a copy of my signature Finial Box. Kind of like following a recipe. Mostly, the boxes came out looking a lot like mine.
Just like the first time I made Elana Amsterdam's Sesame Crackers! The next time I made crackers, I started experimenting. I thought the almond flour had enough oil, so I subbed whey or yogurt for the oil. Flour is flour (more or less), so I've subbed all different kinds of flours for the almond in the original recipe. Maca powder, chia flour, cocoa powder, all count as "flour", too. (Grain flour, I found out, needs a lot more liquid than nut flour.)
Seeds are seeds, so hemp, sunflower, pumpkin seeds, or ground nuts, sub for the sesame seeds. Shredded coconut works as a sub for the seeds, too. Combinations of seeds, coconut, nuts, also work.
Pretty soon, I have crackers in my own style! Just like the next Finial Boxes that my hands-on students will make! Isn't Woodturning wonderful?
Here's Elana's original recipe:
Here's what Tom and David had with their beers:
2. In a 2 cup glass measuring cup, whisk the eggs and liquid of choice. Mix wet into dry. The dough will be very stiff. If it is soft enough to roll easily, it will be too sticky to release from the paper easily. I find it easier to add flour if it's too sticky than to add liquid if it's too stiff. Based on my experience.
3. Roll out between parchment paper to 1/16 - 1/8 in thickness. With crackers, "less is more"- more crackers, that is!
4. Cut with pizza cutter to fit baking sheet & cut into squares
5. Bake at 325º for 7 - 12 minutes, or until "done". Crispy or soft, your choice. Time depends on your oven, your baking sheet, how "done" you want them, and how thick your crackers are. If you don't want to be paying so much attention to the oven, baking at 300º allows for one more cut at the lathe before running back into the kitchen (it's more forgiving of time to cook at lower temp)
Here's what I made last night:
And it doesn't stop there!
For Hummus crackers: add a teaspoon or 2 of garlic powder, some lemon juice as part of the liquid, and use garbanzo flour.
Try adding cinnamon for a graham-cracker-like flavor
Corn flour with chile powder and cayenne = hot & spicy!
Add spices in your choice of intensity: Curry powder, Rosemary, Oregano, Thyme, Chives (dried)
Other flours that I've tried: Amaranth, Quinoa, Rice, Buckwheat. Ground pecans, walnuts, other nuts can be used as flour. So can nut butters.
Sugar is an option, of course. We're trying to cut down on sugar, so I don't add any.
This cracker non-specific-recipe makes a great gluten and grain free pie crust, too.
Go ahead! Make your own Signature Crackers! And then turn a bowl to put them in.
Have fun!
Cindy
 |
| Crackers by CD, Bowl by Dale Larson |
The next thought was, "Amazing how similar cooking is to woodturning!"
I just got home from a trip to the San Diego Woodturners club to demonstrate and teach my style of woodturning. (click here for the pictures posted on Facebook) In the demo, I went through my processes, shared all of my "secrets", and completed 2 of my signature pieces. At the Hands-on Workshops in the days following the demo, I guided the participants through making a copy of my signature Finial Box. Kind of like following a recipe. Mostly, the boxes came out looking a lot like mine.
Just like the first time I made Elana Amsterdam's Sesame Crackers! The next time I made crackers, I started experimenting. I thought the almond flour had enough oil, so I subbed whey or yogurt for the oil. Flour is flour (more or less), so I've subbed all different kinds of flours for the almond in the original recipe. Maca powder, chia flour, cocoa powder, all count as "flour", too. (Grain flour, I found out, needs a lot more liquid than nut flour.)
Seeds are seeds, so hemp, sunflower, pumpkin seeds, or ground nuts, sub for the sesame seeds. Shredded coconut works as a sub for the seeds, too. Combinations of seeds, coconut, nuts, also work.
Pretty soon, I have crackers in my own style! Just like the next Finial Boxes that my hands-on students will make! Isn't Woodturning wonderful?
Here's Elana's original recipe:
Sesame Crackers
- 3 cups blanched almond flour
- 1 ½ teaspoons celtic sea salt
- 1 cup sesame seeds
- 2 eggs, whisked until frothy
- 2 tablespoons grapeseed oil

- In a large bowl, stir almond flour, salt, sesame seeds, eggs and oil until well blended
- Separate dough into two halves
- Line two large (12 x 16) stainless steel baking sheets with parchment paper
- Place one half of the dough in the center of each lined sheet
- Cut another piece of parchment paper and place it over one of the balls of dough
- Roll dough out between the two pieces of parchment paper, until it is ⅛ inch thick and covers the entire baking sheet; remove top paper and repeat process with the other piece of dough
- Cut the dough with a knife or pizza cutter into 2 inch squares
- Bake at 350° for 10-12 minutes, until golden brown
- Cool and serve

Makes 96 crackers
Here's what Tom and David had with their beers:
- 5 cups organic blanched almond flour
- 1/2 cup organic sprouted chia flour
- 1/2 cup organic Maca powder (from Whole Foods)
- 2 teaspoons celtic sea salt (from Whole Foods)
- 1 or 2 cups organic sesame seeds, white and black mixed (from Whole Foods)
- 4 eggs (pasture raised, from a local organic/biodynamic farm)
- 1/4 cup raw goat whey (from making cheese)
2. In a 2 cup glass measuring cup, whisk the eggs and liquid of choice. Mix wet into dry. The dough will be very stiff. If it is soft enough to roll easily, it will be too sticky to release from the paper easily. I find it easier to add flour if it's too sticky than to add liquid if it's too stiff. Based on my experience.
3. Roll out between parchment paper to 1/16 - 1/8 in thickness. With crackers, "less is more"- more crackers, that is!
4. Cut with pizza cutter to fit baking sheet & cut into squares
5. Bake at 325º for 7 - 12 minutes, or until "done". Crispy or soft, your choice. Time depends on your oven, your baking sheet, how "done" you want them, and how thick your crackers are. If you don't want to be paying so much attention to the oven, baking at 300º allows for one more cut at the lathe before running back into the kitchen (it's more forgiving of time to cook at lower temp)
Here's what I made last night:
- 5 c almond flour
- 1/2 c chia flour
- 1/2 c organic cocoa powder (Whole Foods)
- 2 t salt
- 1 c sesame seeds
- 1 c finely shredded organic coconut
- 1 tablespoon organic dried vanilla powder (heavenly!)
- 4 eggs
- 1/4 cup whey
And it doesn't stop there!
For Hummus crackers: add a teaspoon or 2 of garlic powder, some lemon juice as part of the liquid, and use garbanzo flour.
Try adding cinnamon for a graham-cracker-like flavor
Corn flour with chile powder and cayenne = hot & spicy!
Add spices in your choice of intensity: Curry powder, Rosemary, Oregano, Thyme, Chives (dried)
Other flours that I've tried: Amaranth, Quinoa, Rice, Buckwheat. Ground pecans, walnuts, other nuts can be used as flour. So can nut butters.
Sugar is an option, of course. We're trying to cut down on sugar, so I don't add any.
This cracker non-specific-recipe makes a great gluten and grain free pie crust, too.
Go ahead! Make your own Signature Crackers! And then turn a bowl to put them in.
Have fun!
Cindy
Wednesday, September 14, 2011
Free Sharpening of Drozda Woodturning Tools!
Sharp tools are really good to have. In fact, it's almost impossible to get good cuts without a sharp edge.

You probably bought my Signature Woodturning Tools so that you would have the same tools that I use in my work. That's the reason I make my favorite tool grinds available. I want you to have all of the advantages that I have. But, as good as Henry Taylor Tools is, the factory grind is often not quite perfect. At the very least, the tools will "need honing before use" as they say.
To make it easy for you to use my tools, I am offering to sharpen them for free! All you pay is the shipping (both ways).
If you have a Cindy Drozda Signature Woodturning Tool, whether you bought it from me or from a tool supplier, just send it to me. I'll sharpen it, and send it back to you ready to use. How can you get a better deal than that??
.
.
Here's what to do:
Send the tools to me at this address, include return postage (stamps, check, credit card info):
Cindy Drozda
PO Box 19065
Boulder CO 80308
USA
You'll know how much return postage is. It'll be the same as it cost you to send the tools to me.
Please contact me by email to let me know your tools are on the way. If you prefer to use UPS or FedEx, email me for a street address.
If you're local, bring your tools to my shop, or to a RMWT or FRW meeting.
If you're local, bring your tools to my shop, or to a RMWT or FRW meeting.
Happy turning!
Thursday, August 18, 2011
Too Much Dill Biscuits
This is not a food blog, I promise. I am a woodturner, and I blog about woodturning. Well, when I manage to blog at all......
This past year I have been embarrassingly lax in writing to my blog. To snap out of it, I gave myself permission to blog about whatever subject hits me at the moment. At this moment, it's food.
On to my subject - Too Much Dill Biscuits

How much is too much? Dill is in season here. It's a short season, but the dill plants make up for that with abundance. A woodturning friend, Katherine Kowalski, (whose gardening abilities make me "green" with envy) gave me some of her dill harvest.
It was A Lot Of Dill. Even as much as I love dill, I would be hard pressed to use it all up before it spoiled. My challenge: To see how much dill is "too much" in a recipe.
Biscuits are fast to make, and David and I both love them. Great with dinner or as a snack the next day. Any biscuit recipe will do, but here's my current favorite:
Gluten Free and Grain Free Biscuits:
This recipe is adapted from Elana Amsterdam's website, Elana's Pantry. check it out for more great gluten & grain free recipes.
2 1/2 cups organic blanched almond flour
1/2 teaspoon sea salt
1/2 teaspoon baking soda
1/4 cup yogurt, kefir, milk, whey, or other liquid (I make my own raw goats milk yogurt)
3 eggs
1 teaspoon lemon juice
Directions:
Mix dry ingredients
Mix wet ingredients
Combine the 2
Drop by appropriate amounts onto greased baking sheet (or stoneware baking pan like I used). They don't rise much, so "appropriate" approximates intended finished size.
Bake at 350ºF for 15 - 20 minutes, or until golden brown on top and done in the middle.
I added 2 tablespoons of finely chopped dill leaves and flowers to a half-recipe (1 1/4 c flour). I don't think it was too much. Might be a waste of dill, though. The flavor would probably be dill-y enough with half that much. Great with lots of butter!
You can see from the photo that splitting the recipe didn't work perfectly. It's hard to split 3 eggs in half, and I also used too much yogurt. The results "spread" more than I wanted. Still tasted great, though.
The first time I made these, we had them with a baked pasture-raised chicken cooked with an excessive amount of dill and green onions (also from Katherine's garden). Oh, and did I mention massive quantities of real butter???
There is a tie-in to woodturning, here. In my pursuit of the artistic side of working in wood, I like to exercise my Right Brain in the kitchen. Cooking is creative, the ingredients are inexpensive (compared to exotic burl wood), results are immediate. It is something that must be done everyday anyway, if we want to eat a healthy diet. Cooking is a way to improve my woodturning skills! Who would have thought??
Thank you to Katherine for the garden delights, and to Elana for grain free biscuits! Now, off to do some woodturning........
Friday, May 28, 2010
My brand new Presentation for the AAW Symposium in Hartford!


Am I nervous, giving a new presentation for the first time? Of course. As always. In Aviation, we always used to say that a healthy level of nerves is what keeps us alert and therefore alive. There is a bit less performance pressure among my local friends at the RMWT than there will be at AAW. At the same time the club offers pressure of a different kind. The AAW symposium attendees who come to my presentation in Hartford will be in that room at that time because they are (at least presumably) interested in my subject. The RMWT members are just attending the meeting, willing to watch whatever and whoever our program director (David Nittmann) chose for us. They may have no interest whatsoever in my subject! Add to that the fact that I am really best at making stuff out of wood. I learned to do digital image and video editing mostly as a necessary part of my business.
In this Image Editing presentation, I will be sharing some of the skills that I have found valuable. Just making artwork is not enough, in itself. Sharing my work with the world is what brings the energy full circle, and gives the greatest reward of all. The creative process brings me close to the work in a way that the viewer of the piece doesn't always see. And the viewer sees things in my work that I might not have been consciously aware of. That subject is fuel for a whole 'nother discussion, on another day!
Digital images, in all of their forms, are the best way to facilitate sharing our work with the world. In my case, I use digital images extensively in marketing. My website, printed ads and articles, notices about my demonstrations (like this one in the RMWT newsletter), business cards, show applications, selling on various websites (such as the AAW online gallery); they all ask me to edit digital images!
What I find, in learning to edit images, is that the Computer offers as much creativity and adventure as Woodturning does!
So, please attend my digital demo at RMWT, or at AAW in Hartford. You just might get inspired to have some fun with the camera and computer!. I hope so. See you in Hartford!
Thursday, May 27, 2010
Wild Iris on the Mesa Trail, Boulder Colorado
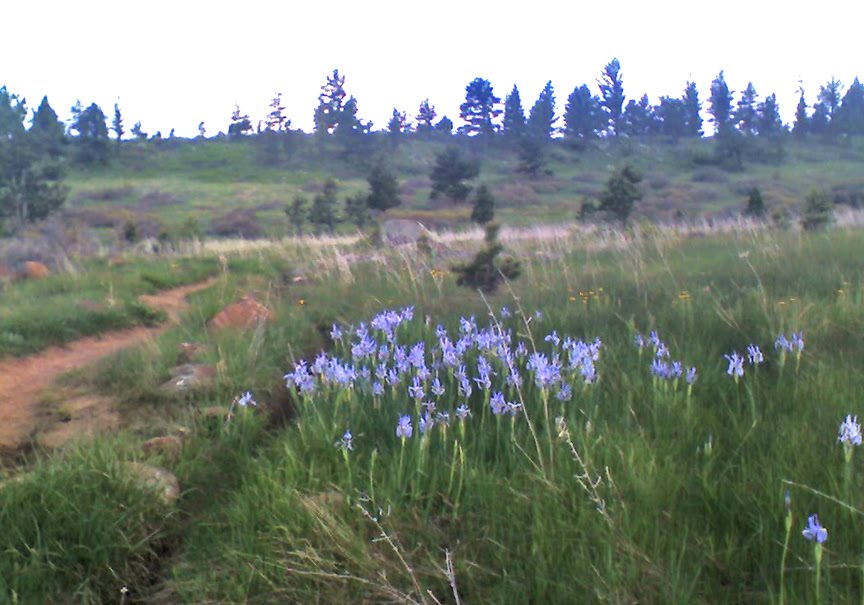
The Mesa Trail is one of my favorite trail runs, and this is its best season. Wild flowers are just coming out, the mud is drying up, and the temperature is right in my ultimate comfort zone - 75ºF. The winter chill and howling wind are giving us a break, at least for today.
I saw a black bear near the trail, just standing there, totally ignoring me. I was too overwhelmed to think of getting my phone out and taking the bear's picture.
 This patch of wild iris was on the trail that I took to avoid meeting the bear again (just in case). It moved me enough to remember that I had a camera with me (my cell phone).
As I continued on the run after taking the picture, I imagined telling Gram "I saw some beautiful wild iris today while I was out jogging, so I took a picture with my phone to send you in an email." In the century of Gram's life, she saw the world change a lot. I visualized her as a young woman in the early 20th century, hearing me say that. Her reaction would probably be: "you were doing what? and took a what?? with your WHAT??? to send me a WHAT????"
Things that are a commonplace part of my everyday life, were not even in her vocabulary! She grew up on a family farm. They got so much exercise in the course of daily life that the concept of "jogging" just for "exercise" would sound ridiculous! The telephone and camera had been invented, yes, but they were cumbersome and expensive, and not something that people used every day. Sitting for a photograph took all day, and the telephone was just for emergencies, like a birth or a death in the family. Definitely not the sort of thing that a person on foot would have in her back pocket while out in the woods. The internet, and digital images, were not even thought of yet!
Thinking about what changed in our world in Gram's 102 years makes me wonder what changes we will see during my own life. I hope I am blessed with a long life, because I'm eager to see what wonders are revealed in these next 50 years!
Thursday, May 20, 2010
American Association of Woodturners Symposium in Hartford CT, June 18 - 20
 Wow! Where have I been???? I'm ashamed to see that I haven't posted to this blog since December. Guess I've been busy, to say the least!
Here it is almost summer again, and time for the annual American Association of Woodturners Symposium. This year's symposium will be held in Hartford Connecticut, June 18 - 20. I hope you'll all join me for a great time, filled with woodturning, inspiration, and friendship! The AAW website, www.woodturner.org, is the place to find out more info.
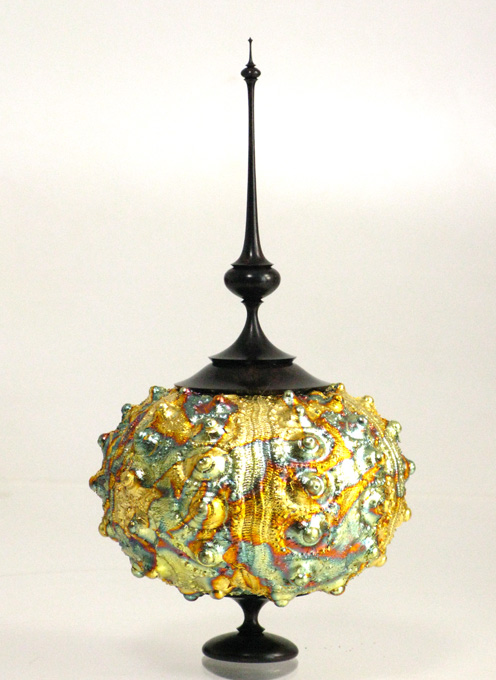
 The theme of this year's Professional Outreach Program Exhibition is "Teapots". Here is my contribution. It's a Gilded Sea Urchin Teapot, named "Having Tea with my Good Friend Wiley-O". Wiley-O is a cat who now lives in the spirit world (I miss him terribly). Inside the teapot is a bit of his favorite brew - catnip. The pieces in the exhibition will be on display for the duration of the symposium, and then will be sold at live auction on the last day. I love those live auctions! Very exciting! Especially the live auction at the Saturday Banquet. That's where the best pieces by the AAW's most skillful artists are auctioned off to benefit the Education Opportunity Grant Fund. Don't miss that one! It's always the highlight of the symposium for me!
The AAW symposium is a big deal for me this year because I'm an Invited Demonstrator, for the first time. Oh, I've demonstrated at the symposium several times since my first one in 2001, but I always had to apply and be approved. This year, I'm Invited! I guess that means higher status. It's going to be hard to tell, they treat all of the demonstrators very well.
I'll be a busy girl in Hartford! I'm doing 6 regular rotations, and a panel discussion. One of my demos is brand new, and so is my panel presentation. I'll be quite busy between now and June17! More on that in my next post. And it won't be 5 months, this time, I promise!
Are you planning to come to the symposium? Just do it!! You won't regret it! Even if you didn't want to sign up for any of the over 100 excellent demonstrations, the Trade Show and Instant Gallery are FREE and open to the public! That alone is worth the trip! I'll be demonstrating at the Trade Show when I'm not
doing a symposium rotation.

Hope to see you in Hartford!
Cindy
Sunday, December 20, 2009
Sharing food for the holidays
With my commitment to giving handmade gifts, this holiday season I decided to give gifts of food. Flavored, roasted nuts are a tasty and healthy treat! The main inspiration for this idea comes from Elana’s Pantry. I also picked up a flyer at Whole Foods Market with a recipe, and got hints from reading the ingredients on some commercially produced roasted nuts.
Our holiday plan is to spend Christmas day with David’s (grown-up) kids, their spouses, and the grandkids. A total of 8 people. I sure have been having fun concocting different flavor combinations so that each person’s jar of nuts will be different. As usual with food experiments David and I are the research team. We also get to (or have to) eat both the successes and the rejects!
These flavored roasted nuts are easy to make, even in my miniature oven! And they’re Gluten-Free, too.
Start with:
2 cups nuts of your choice (cashews, pecans, almonds, walnuts, peanuts, sunflower seeds, etc)
Add:
2 tablespoons liquid (Tamari, honey, maple syrup, agave, vanilla extract, or any combination)
Mix until the nuts are all coated.
Mix together spices, if desired, about 2-3 teaspoons. A bit of salt can boost the flavor of sweet mixes. For extra sweet flavor, brown sugar or maple sugar are good.
Sprinkle powder over wet nuts and mix up together until all the nuts are coated with the powder.
Spread a relatively thin layer of coated nuts in a buttered baking pan (I use a pyrex or ceramic pan). Adding extra butter (like about 1/2 tablespoon) to the baking pan adds a nice flavor, too!
Bake at 300ºF for about 15 – 20 minutes. It’s easy to over cook these! They won’t necessarily “look done” until they are over done. I go by smell (if the nuts smell roasted, they are done), or by taste testing. Getting to know your oven/pan characteristics will make this easier.
As for flavor and nut combinations, the sky’s the limit! I’ve still got several ideas that I’m planning to try.
Here’s a list of some that I’ve tried:
Pecans and/or almonds with maple syrup or honey
Cashews with tamari and curry powder
Almonds with tamari and a spice mix of garlic powder, chili powder, cumin, and turmeric
Pecans and/or almonds with tamari and honey and a spice mix of chili powder and cumin
Almonds with honey and cinnamon
Walnuts with maple syrup and maple sugar
A handmade gift comes from the heart

My grandmother used to say “when you make a gift for someone, you give them a gift from your heart”.
In our family, we made a lot of our gifts to each other. Especially for grandparents, of course. That is a tradition that I’ve kept with me throughout my life. I don’t go into mass-gift-production and make things for everyone I know. Usually just a few significant people, different ones each year, receive handmade gifts. These gifts are expressions of how those people had touched my life at the time.
When I became a self-employed artist, most of the products that I started selling were things that I had originally made as a gift for someone. I still very much enjoy having somebody buy my piece to give as a meaningful gift to someone special. That, I believe, is why I have never had any problem letting go of my creations, even after I have put so much of my energy into them. It still feels, for me, like making gifts for special, significant people. Sharing my work with people who care is what makes my “job” worthwhile!

David’s grandkids know that I don’t want any bought gifts. If the kids (now aged 10 – 14) want to make me something, I’ll be thrilled. But not random “stuff” just so I can “have something to open” when the family gets together at Christmas.
One year recently, they all 4 made me frogs (I have a special fondness for frogs….) out of polymer clay. Wow! How perfect! Those frogs still sit watching me as I type on the computer.
Handmade gifts that are bought from the maker have a special significance. I see that so clearly now that I make my living making gifts that other folks give to each other. When I make something, it is an expression that comes from my heart. And then the buyer, having made a careful and thoughtful selection (my work is not inexpensive, after all), gives a gift from their heart to someone who is special to them. It’s wonderful! Now the gift comes from my heart, and from yours, to someone who is meaningful to you!
What could be more expressive of the holiday spirit??
Ok, on to the point of this post!
There are lots of ways to give your loved ones a handmade gift that comes from the heart. I’m not saying that everyone should buy one of my pieces to give as a gift (though I wouldn’t object!). There are so many ways that we can express that true giving and Christmas spirit!
Here’s a list of ideas:
Etsy.com is an online marketplace for handmade work of all kinds, in every price range. Here’s my etsy shop: http://www.etsy.com/shop/cindydrozda
There are craft shows and art shows at all levels in almost every  town. Look around in your area, and you’ll find them.
Schools and churches also usually have holiday sales. Museums and Arts Centers, too. In our area the Arvada Center for the Arts has a sale that goes through this weekend: www.arvadacenter.org
Craft shops and art stores, often artists cooperatives, are
places to find handmade work by people from your local area.
Here’s the best one: Make your own gifts!!! You’re not an artist? I don’t believe it! You don’t have time? It’s not necessary to make something for everyone you know!
Just for a few significant people. 
Try these ideas (and add some of your own):
If you’re a Woodturner, make ornaments, pens, oil candles, tea lights, vases, art pieces, bottlestoppers, Your skills will improve, and your family will love it! Start a tradition of making a new ornament design every year for everyone in the family!
Create a handmade card. Cutting, glueing, painting, scrapbooking, writing…. Remember, it comes from your heart!
Print out pictures that have meaning, and share them. My mother used to put together a photo collage of us kids for the grandparents every Christmas. David’s daughter puts together a calendar with pictures of the grandkids, and everyone’s birthdays.
Bake cookies, or make a pie, or jam, or whatever your culinary specialty is.
In my next post, I’ll share my gift recipes for this year.
Give a “coupon” redeemable for some kind of service that you provide. As kids, we used to do this a lot. Mowing the lawn, weeding, putting up Christmas decorations, taking someone out to dinner….. use your imagination (and your heart).
 Share the love! Family and relationships are life’s true treasures!
Happy holidays to all of my friends and family!
Wednesday, December 2, 2009
My Signature Pumpkin Pie Recipe
This Thanksgiving, I didn’t cook a turkey. I never do. Our 2009 holiday celebration meal consisted of sautéed Kale with cranberries and roasted chestnuts (find the recipe at Elana's Pantry), and for the main course: Pumpkin pie!
Pumpkin pie is my one culinary “specialty”. I didn’t learn how to make a traditional pumpkin pie from my mother, I have pursued and developed my own signature style of pumpkin pie making. In my 20s and 30s, I would buy pumpkins in the fall, cook them up, and go into pie production. Sometimes I gave pies away or brought them to holiday pot-lucks, but mostly Ion (my spouse at the time) and I just ate them. We would cut a pie into quarters and each have a quarter-pie for breakfast. After work (yes, I did used to have a “job”) we’d each have another quarter, finishing off the pie. That’s one pie per day. Now you see the need for pie production! I’d mix up filling for 4 pies at a time and buy frozen crusts (making pie crust always seemed like a poor expenditure of my time). I had a full size oven in those days. But I didn’t believe in “kitchen appliances”, so the pumpkin didn’t get pureed, just kind of mashed up. The texture of “real” pumpkin is quite good, and gave the pies a very interesting “signature style”.
My pumpkin pie’s signature style has evolved over the years, as any artist’s work will. Now, I have a stick blender that makes the mixing go much faster, and my pies have a smoother texture. My current kitchen is very tiny, and the oven is a miniature convection oven with barely enough room inside for a pie pan. Fortunately, over the years I have also lost the desire to have a quarter of a pumpkin pie for breakfast, so the oven’s size is not too much of a limitation. I do still usually refuse to spend my time making pie crust. The store-bought ones (organic ingredients, real butter) come in packages of 2, so my recipe makes 2 pies. My sister, Sue, periodically inspires me to try making pie crust. She makes an awesome, great tasting crust! Her secrets? Three things: King Arthur flour, real butter, and room temperature ingredients.
Pumpkin pie is healthy food. Vegetables are good for us, and my pies are heavy on the squash. I always use fresh organically grown pumpkin, acorn, butternut, or any other kind of squash. Any squash will do. I’ve even made good pies with carrots when our garden produced an abundant harvest. Eggs are from local farms where the chickens really do run free and eat bugs. Extra eggs make this pie “low carb”, and a good source of protein. Yogurt is home-made (by me) from fresh, raw, local goat milk. Local honey is supposed to be healthy, in moderation, and I do prefer a less-sweet pie.
There is nothing quite as good as a warm piece of pumpkin pie with melting vanilla ice cream! So much for the “moderation”….. Life is short – eat dessert first!
CD’s Signature Pumpkin Pie
Makes 2 pies
4c pumpkin or other squash
8t spice* (mix below)
6 eggs
1t salt
2c yogurt or 1 (12 oz) can evaporated milk (full fat, low fat, goat, cow, etc)
1 – 1 1/2c honey, agave, maple syrup, barley malt syrup, etc**
1/4c molasses
2 unbaked pie crusts of choice
mix spices with pumpkin, then mix in everything but the milk or yogurt. Add milk or yogurt last. Mixing can be with fork (for lots of pumpkin texture), egg beater, or an electric mixer (for smoothest texture).
Pour into unbaked pie shell and bake at 350ºF for 40 – 50 minutes (until pie is solid when jiggled). In my oven, I need to cover the edges of the crust with foil (not the filling of the pie, just the exposed edges of crust) to keep the crust from burning. Baking time and crust burning tendencies seem to vary widely according to the oven in question. I hear that some folks need to start the baking with the oven at 375º for 15 minutes to brown the crust. I seem to have the opposite problem.
Keep in mind that I am used to baking at 5300’MSL. Lower altitudes might have different results (let me know if you find this to be true….).
*spice mix:
1 part Nutmeg
2 parts Cloves
8 parts Cinnamon
8 parts Ginger (powdered)
**The amount of sweetener is a matter of personal taste. Some like a sweeter pie, some don’t. I like it less sweet, planning to add sweetened whipped cream, yogurt, or ice cream. I currently use 1 cup of honey for the sweetener in this recipe.
Barley malt is less sweet, so more is needed. With maple syrup, it is a good idea to eliminate the molasses so it doesn’t overpower the maple.
Happy Thanksgiving, everyone!
Tuesday, September 15, 2009
Where are those woodturning tools REALLY made?
 This might be just hearsay, but it gave me a pause:
I heard a rumor today that, in order to mark turning tools “made in Sheffield”, the tool maker merely has to “add significant value to the materials”.
This means that “M2 HSS” that is imported, for example, from China could be machined, sharpened, and put into a handle (that perhaps was also imported), and then marketed under an English company’s name as being “made in Sheffield”! This is shocking! And discouraging, too. The same situation also probably exists with all kinds of goods, manufactured in many other countries, like the US.

In the case of turning tools, it is the quality of the steel itself, and its proper heat treating, that brings value to the tool being made in Sheffield. Using imported steel and “adding value” to it in Sheffield is not giving us what we think we are getting.
What this means to me is this: it is no longer enough simply to buy a “name brand” (of turning tools or anything else for that matter). Or to look at where something says it is made and believe it. We need to know the people that we buy things from well enough to trust their morals and marketing statements. We need to ask before we buy, especially if a suspiciously low price makes us wonder about the quality of something.
Now, more than ever, personal relationships and personalized service are the most valuable “product” that a company has to offer its customers.
I plan to ask the important questions before I vote with my cash by buying, well, anything, not just turning tools! If the sales person can’t answer my question about a tool and how it was made, I will look for a supplier who can and will.

And in case anyone’s wondering, my Signature Tools are made in Sheffield, from steel that is made and properly heat treated in Sheffield. They are made by a company, Henry Taylor Tools, with a long standing worldwide reputation for quality. There is an actual person attached, Barry Surplice, who I can talk to and expect to receive honest answers to all of my questions.
 My tools are supplied in the US by a company, Packard Woodworks, that also has a reputation for quality and excellent service. The owner, Brad Packard, is a real person who will give me honest answers.
This is important to me. It's the PEOPLE who make life, and woodturning, meaningful!
Saturday, August 29, 2009
Group Magic – Sharing is the key to learning

Last month (July 2009), I taught a 5-day hands-on Woodturning Workshop at Craft Supplies in Utah. It was an incredible learning experience for all of us!
We started with a group orientation, and stating our individual goals for the class. Sharpening, tool control, and design were all high on the list.
My goal is to share to what I know, and to help each participant to achieve their own goals for the class.

Day two started with a spindle exercise, and then on to making finials for our vessels. The idea of these first two days is to loosen up and get into the woodturning groove.
At our daily group critiques, we explore how to look at our work. For me, group critiques are the best part. Something magical happens when we start sharing ideas with each other. Learning how to look at our work and see both success, and room for improvement, is one of the most difficult skills for artists to learn. And it is essential if our work is to keep progressing.

On Wednesday we made my signature “Fabulous Finial Box” as a group. All of that exercise and practice really paid off! The Finial Box is a complicated and demanding project. After some “design opportunities”, and miraculous recoveries, everyone had a completed Finial Box.


For the last two days of class, everyone was encouraged to follow their own inspiration. It was a bit chaotic, but we had some incredible creative energy flowing. There were 4 or 5 different projects going at once: Mushroom boxes, Square Bowls, experiments with brightly colored dyes, more Finials, and Hollow Vessels.
A couple of the participants hollowed a vessel for the first time. Thanks to the Jamieson Captured Hollowing System, the hollowing process was a relaxing and successful experience!
Myself, I was in heaven watching, and helping, everyone explore different projects and techniques. Such marvelous individual, creative expression! I always get such a charge out of teaching a woodturning class!
 After 5 intense days of serious Woodturning, I was pleased to see turning and sharpening techniques improve. Everyone picked up new ideas and new ways of looking at, and improving, their work.
Subscribe to:
Posts (Atom)
